There are multiple editions of SQL Server 2014 (Enterprise Edition, Enterprise Core Edition, Business Intelligence Edition, Standard Edition, Web Edition, Express and Developer Edition). SQL Server 2014 has a free edition – Express and while the server itself lacks some options that other editions have, SQL Server 2014 Management Studio is the same and can be used with each of these.
Obtaining the installation file
The entire SQL Server
Express edition can be downloaded from
this link, however, for downloading only
SQL Server 2014 Management Studio, clicking the
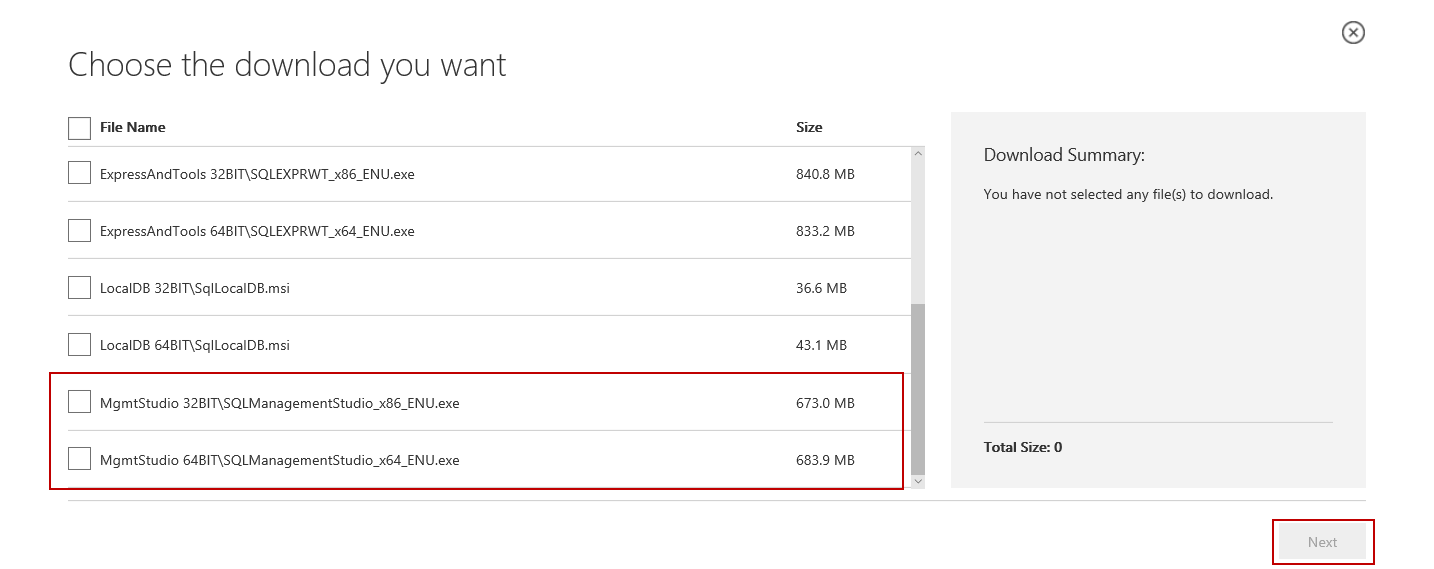
Download button will present a list of all files the complete installation is contained of, but you’ll need only one of these:
The bottom two files are MgmtStudio 32BIT\SQLManagementStudio_x86_ENU.exe and MgmtStudio 64BIT\SQLManagementStudio_x64_ENU.exe and you should choose one of these according to the operating system running on the machine(32 or 64 bit), on which SQL Server Management Studio will be installed.
If you aren’t sure which operating system type is installed on your machine, you can check it by right-clicking in My Computer>Properties. The current operating system will be specified under System type.
After selecting the desired file, click on the Next button in the bottom-right corner and the download will begin.
Installation
The downloaded file should be in .exe format with size of approximately 650 MB. Double-click on it to run the installation:
The window for choosing directory to which the extracted files will be saved is shown. After choosing the directory click the Ok button and extraction will begin
When the extraction is completed, it’ll take a couple of seconds until the SQL Server 2014 setup processes the current operation. After that, the following window will open:
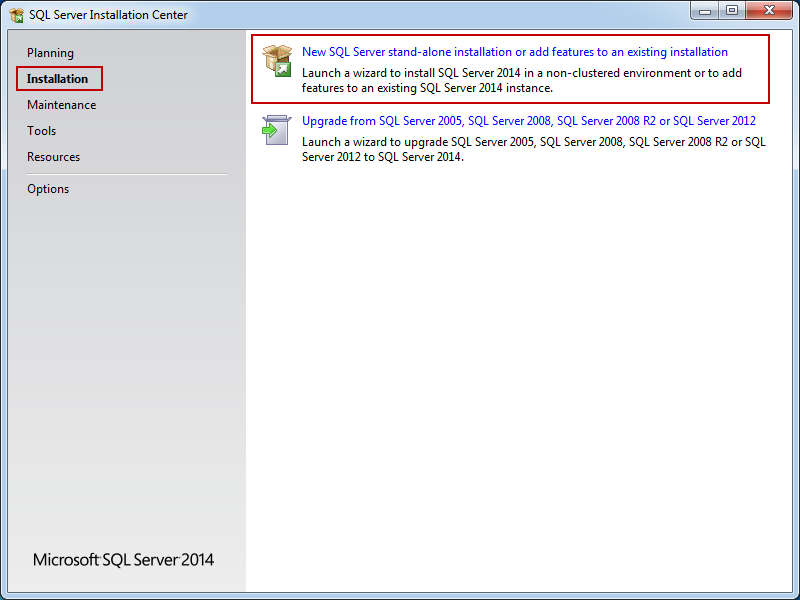
This is the primary installation screen and the other SQL tools installation can be started here as well. If not already selected – select the Installation tab in the top-left corner of the SQL Server Installation Center.
For installing SQL Server Management Studio alone, select the New SQL Server stand-alone installation or add features to an existing installation option (as in the screenshots above).
Once the installation wizard starts the SQL Server Installation Center can be closed.
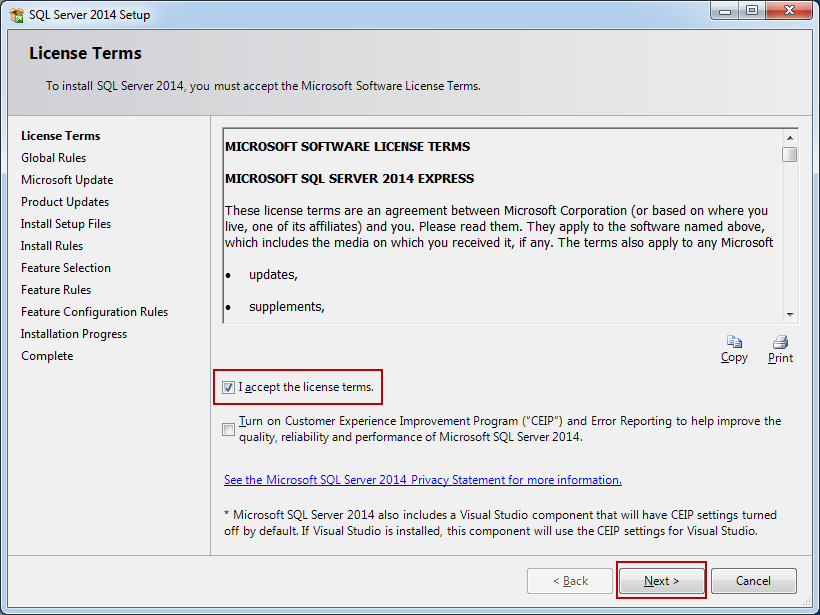
It’ll take a couple of seconds for the setup rules to be checked (pre-requisites on the operating system). If all the requirements are meet, the SQL Server 2014 setup will start with the License Terms tab as a first step:
To proceed with the installation, read the license terms and then check the I accept the license termscheckbox. The CEIP (Customer Experience Improvement Program) checkbox is optional, but if it’s checked, the program will be able to collect information about the computer hardware and how the product is being used (without interrupting users); the next releases of SQL Server are upgraded based on this information.
After checking the I accept the license terms, the Next button can be clicked to proceed.
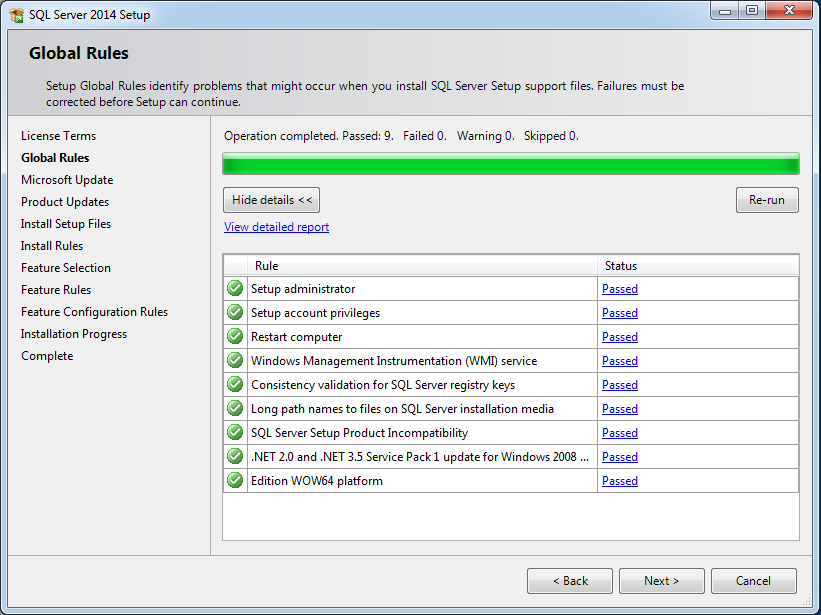
The next step is the Global Rules. Setup Global Rules identify problems that might occur when installing SQL Server 2014. Which rules are those in some extent depends on which operating system you are installing to but usually include the following:
- Whether the logged-in user is a system administrator with appropriate privileges (a must be)
- Whether there are any reboots pending from other installers
- Whether required .NET components are available
- Whether there is support for long pathnames where the installation media resides
- The consistency of any SQL Server Registry keys
If all the rules are passed, the Global Rules step will be processed and skipped automatically. If some rules don’t pass, you must correct these in order for setup to be able to continue:
Most of the known issues are elaborated with solutions and workarounds on the
Microsoft forum
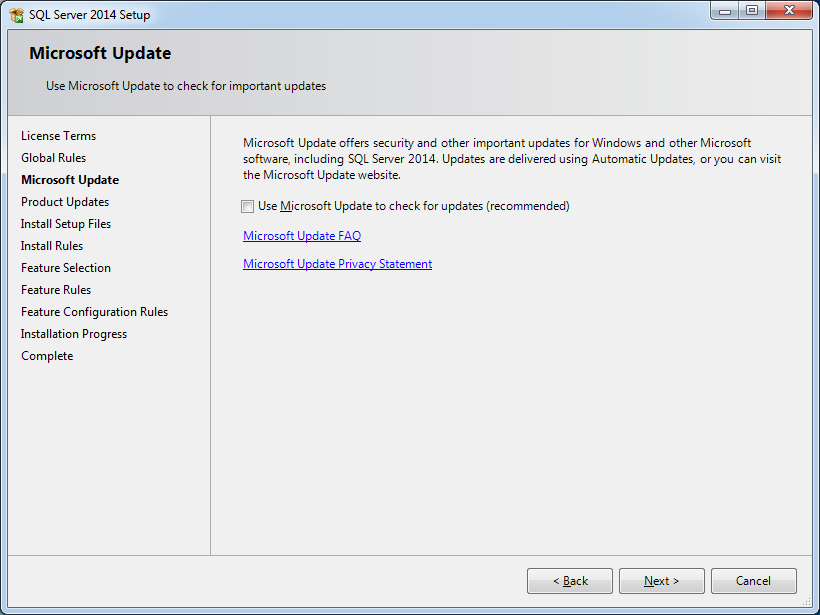
The next step of the setup is the Microsoft Update. It’s optional and whether you select it or not, the installation will be able to proceed after clicking the Next button.
Once checked this option gives the opportunity to download the update and incorporate it with the installation. This action will take some time, as those updates need to be downloaded as well.
If you proceeded without checking for updates or it is checked, but there aren’t any updates available, the Product Updates step will be skipped:
It’s recommend that the Microsoft update option is checked to ensure all patches are applied.
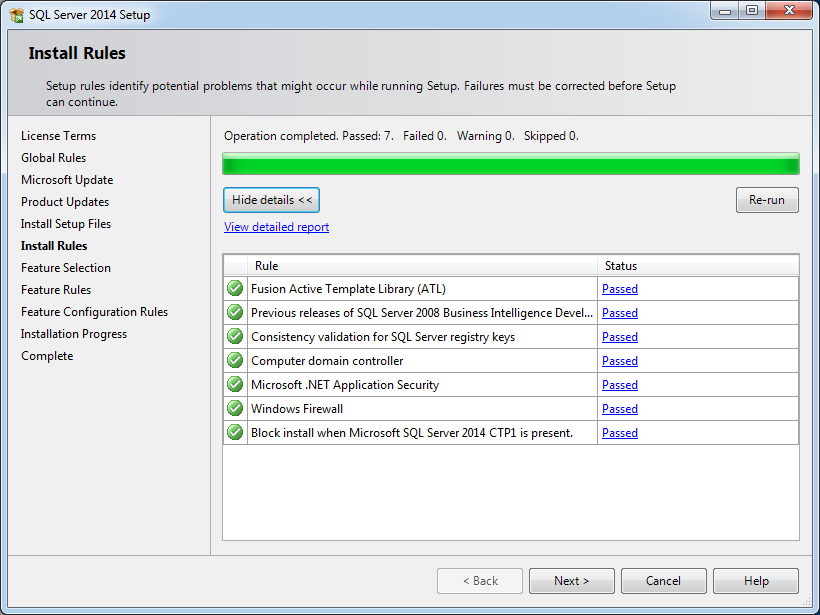
Install Setup Files and Install Rules steps are automatically processed. However, the Install Rules is yet another step where the setup wizard is checking if certain software requirements are met:
- Need for reboot in order for changes to apply
- Whether there are some previous releases of SQL Server
- Validation of SQL Server registry keys
- Whether the computer is a domain controller
- Security settings
Every rule in the list has a status (whether it’s passed or failed); clicking those links provides additional information if something went wrong.
One rule that will almost certainly throw a warning is Window Firewall. This issue specifically can be solved by adding SQL Server and its features to Windows Firewall exception list. Otherwise, SQL Server Management Studio is unable to connect to remote servers.
If some of these don’t pass, they must be corrected in order that setup can be continued:
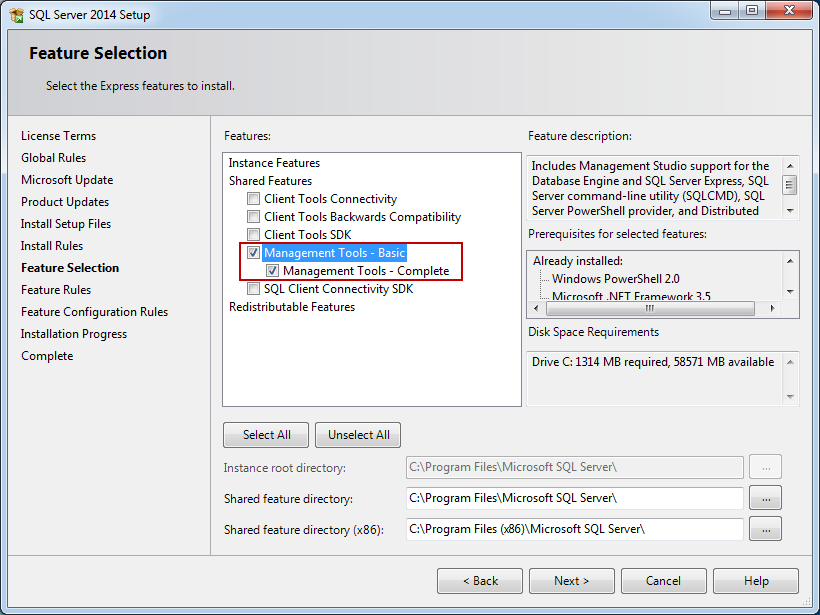
In Feature Selection step the only options that needs to be checked in order to install SQL Server Management Studio is Management tools – basic and sub item: Management tools – Complete, however, SQL Client Connectivity SDK will be installed by default, whether you checked it or not.
Each feature has prerequisites which are shown in the Prerequisites for selected features field located right of the Features field, and if some are missing, those will be installed along with SQL Server Management Studio:
In addition, there is a short description for each feature in the Feature description field for more details.
SQL Server Management Studio will be installed in default directory on system partition, but below the Features field it can be altered in which directory you want these shared components installed (as shown in image above)
After you proceeded on the Next button, Feature Rules and Feature Configuration Rules steps will be processed automatically if all the Feature Rules are met:
- Prior Visual Studio 2010 instances requiring update
- Microsoft .NET Framework 3.5 Service Pack 1 is required.
You must repair failures for the installation to be able to proceed.
The update required for Visual Studio is contained on the SQL Server installation media and it’s named VS10sp1-KB983509.msp.
The Microsoft .NET Framework 3.5 Service Pack 1 can be found on
this link.
When all the rules are passed and the Feature Rules and the Feature Configuration Rules steps are processed automatically, the installation process will start in Installation Progress step.
The SQL Server Management Studio installation process should take no more than approximately 4 minutes if there is no actual server installed on the machine After the installation process is completed, the last step of the installation wizard will be presented:
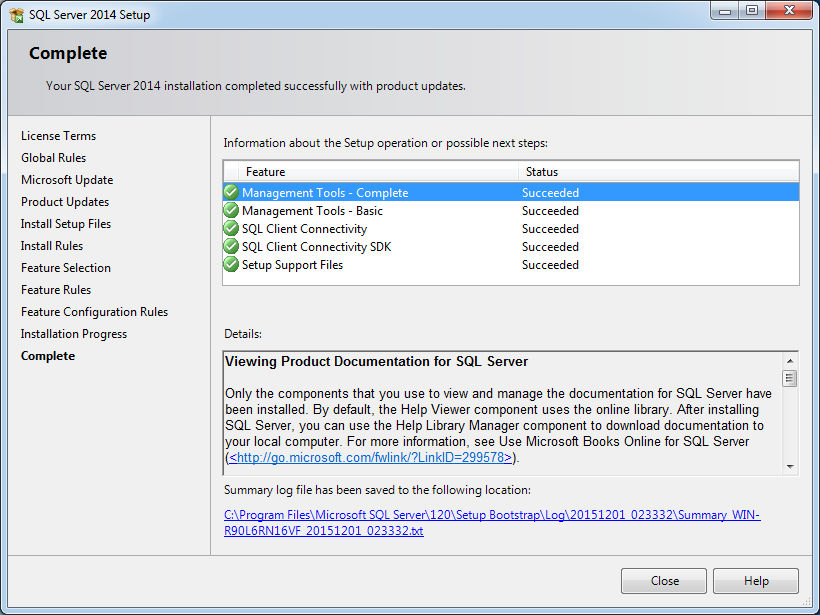
In the Complete step, the summary for all the installed features and status of installation for each one, will be shown.
In the field bellow, labeled Details, will be additional links for Release notes, Sample databases (applicable only if you have server installed on the machine), Microsoft Updates, etc.
Also, a link will be presented on which you can find Summary log saved as txt file.
Installing SQL Server 2014 Management Studio with previously installed SQL Server 2014
If you’re installing SQL Server Management Studio on the machine on which there is a previously installed SQL Server, there will be minor differences and an additional step in the installation process:
First step will be the Global Rules instead of License Terms.
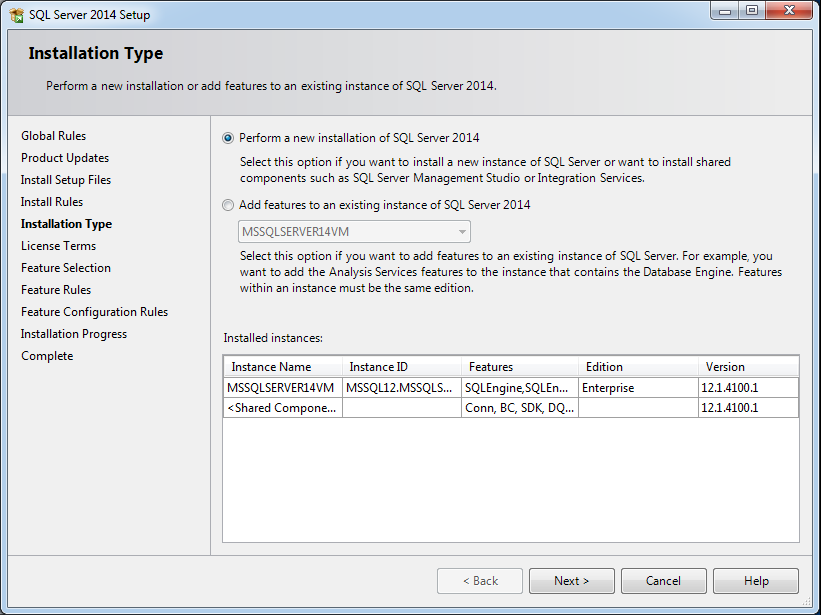
After the Install Rules are passed, the additional step – Installation Type – will be next:
As SQL Server Management Studio is a shared component and it is installed as a feature of SQL Server, but can also function as a stand-alone application (not as a feature of a specific server), it’s up to you how will you install it, because it’ll work either way.
Just note that if you select Add features to an existing instance of SQL Server 2014, you must define instance to which you’re adding feature in the drop-down list below the second radio-button
- The final difference is that instead as a first step, License Terms will follow the Installation Type. In order to proceed with the installation, read the license terms and then check the I accept the license termscheckbox
- For the rest of the installation, continue from the step number 7, as these are identical
Whichever type of installation you’re performing, after the installation is finished, on the Close button the installation wizard will close and your SQL Server Management Studio will be set for the first use.
Now that you have installed SQL Server 2014 Management Studio, you can update this software with some free add-ins from ApexSQL that will add formatting, auto-complete, refactoring and search capabilities. Click
here to see how to install these.

